
Systeme.io Tutorial for Beginners: Step‑by‑Step Guide to Launch Your Online Business
Starting an online business can feel overwhelming — too many tools, too much tech, and too many moving parts. You might be wondering:
Where do I start?
Do I need expensive software?
How do I build a funnel if I’m not tech-savvy?
This is where Systeme.io becomes a game-changer.
Systeme.io is an all-in-one marketing platform that lets you build sales funnels, send automated email campaigns, sell digital products, and run your online business without needing multiple tools. It’s one of the most popular free funnel builders for beginners and entrepreneurs who want a simple, affordable way to launch and scale.
To start using Systeme.io, you’ll need to create an account, build your first funnel, set up your email marketing, connect your payment options, and publish your product or online course.
Below is a step-by-step guide on how to use Systeme.io effectively:
Create a free Systeme.io account and fill out your basic profile information.
Connect your custom domain and set up your preferred payment gateway (Stripe or PayPal) in the Settings panel.
Build your first sales funnel by choosing a ready-made template and customizing each step: opt-in page, sales page, checkout page, thank-you page, etc.
Edit your funnel pages using the drag-and-drop page builder and make sure content is optimized for SEO for higher visibility.
Set up your email marketing by creating newsletters, broadcasts, or automated email sequences to nurture subscribers.
Import and manage your contacts using tags, segments, and automation rules for better targeting.
Create and sell your online courses by adding modules, lessons, and connecting them to your funnel or membership area.
Launch your own affiliate program with customizable commissions to grow your sales through referrals.
Why Systeme.io Is the Perfect Tool for Beginners
Before diving into the tutorial, here’s why so many first-time entrepreneurs choose Systeme.io over any other funnel builder:
✔ No tech skills required
Drag-and-drop building. No coding. No overwhelm.
✔ Everything in one place
Funnels, emails, courses, membership, blog, payments, automation, community, calendar, and digital store — all under one dashboard.
✔ Starts completely free
You can build funnels and send emails without paying a cent until your business grows.
✔ Built specifically for beginners
The interface is clean, fast, and designed to remove confusion.
If you’ve been scared to start… this is your sign that building your online business can finally feel simple, clear and doable.
Things You Need Before Getting Started with Systeme.io
Before you begin using Systeme.io, make sure you have the following:
A valid email address – Required to create and verify your Systeme.io account.
Basic personal or business information – Needed for completing your profile and account settings.
A Stripe or PayPal account – Essential if you want to accept payments and sell digital products, courses, or services.
A product or offer idea – This will help you decide what type of funnel to build (lead magnet, sales funnel, webinar funnel, course funnel, etc.).
That’s it — everything else inside Systeme.io can be set up and customized later as your business grows.
Join Systeme.io Today — Instantly Receive My Free Gift + Bonuses!

Part 1: Create Your Systeme.io Account
1.1 Visit the Systeme.io Website

1.2 Choose the Right Systeme.io Plan
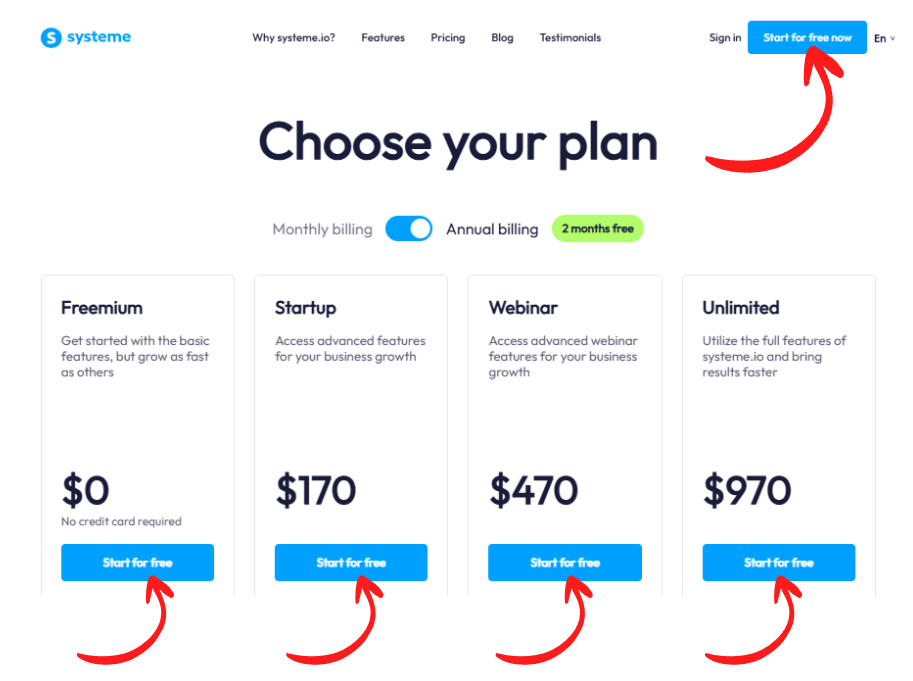
Systeme.io offers one of the best free funnel builder plans on the market, along with three paid plans: Startup, Webinar, and Unlimited.
Each plan includes different features depending on your business size and goals, so compare them and choose the one that fits your needs.
You can start with the free plan to test the platform and upgrade later if your business requires more features.
And if you’re considering the Startup plan, it’s incredibly affordable at just $17 per month — a price that’s hard to beat for everything you get.
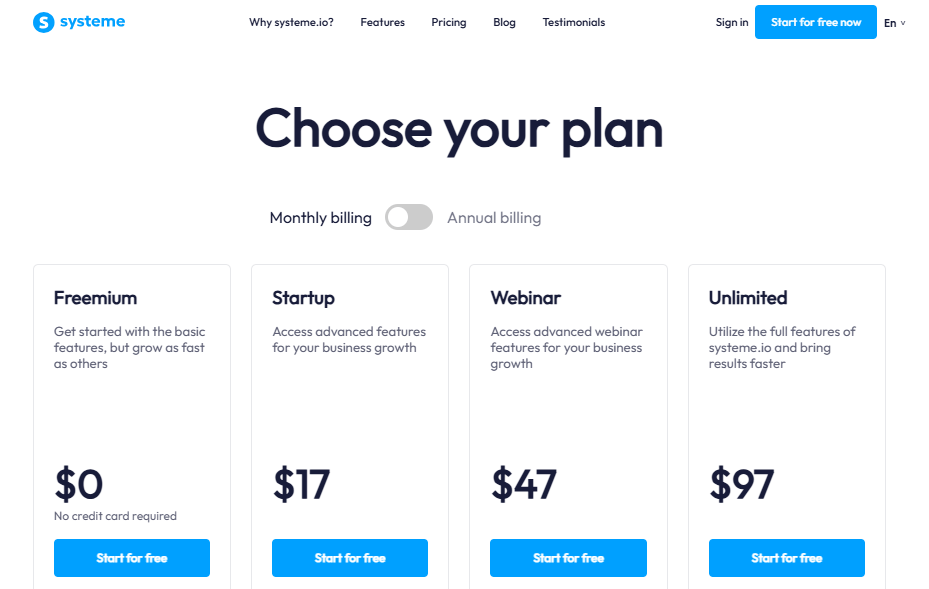
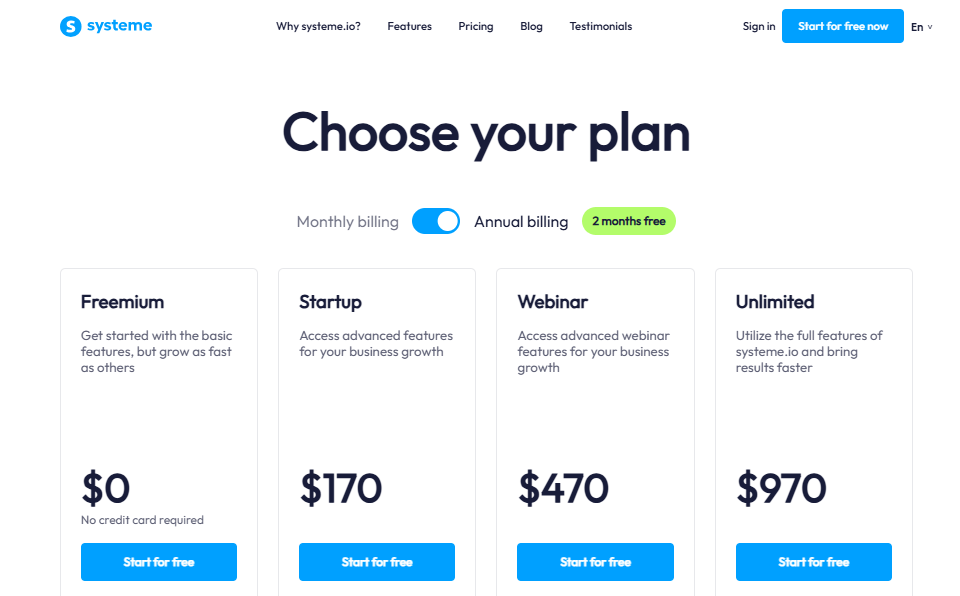
Even better, if you choose the annual Startup plan, you actually save two full months for free, making it one of the smartest budget-friendly upgrades for new marketers.
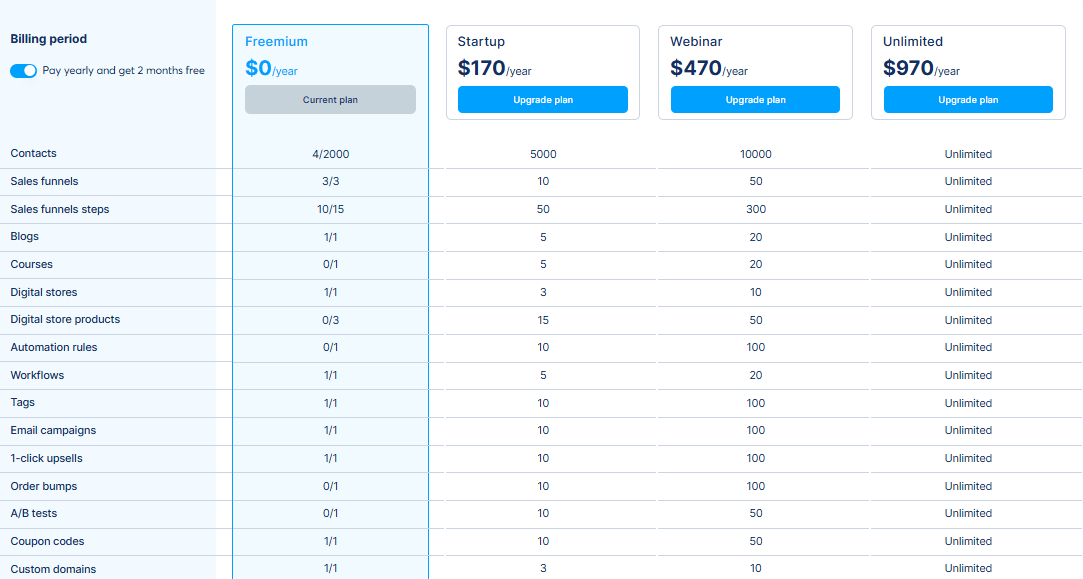
Another powerful reason to upgrade to the Startup plan is that the limits on the Free plan can hold you back very quickly. With only 2,000 contacts, 3 funnels, 15 funnel steps, and just one automation rule, workflow, tag, upsell, and order bump… you’ll quickly hit a ceiling the moment you start building real, conversion-optimized funnels.
If you want to create professional funnels with multiple upsells, downsells, bump offers, and automated follow-ups, the Free plan simply won’t be enough.
That’s why I strongly recommend starting with the Startup plan right away. You immediately unlock 5,000 subscribers, 10 funnels, 50 funnel steps, 10 automation rules, 5 workflows, 10 tags, 10 one-click upsells, and 10 order bumps — all the room you need to scale like a pro.
And the best part?
The annual Startup plan costs only $170 per year.
When you compare this to competitors like GoHighLevel ($97/mo Starter, $297/mo Unlimited) or ClickFunnels ($97/mo and $81/mo on annual billing), the value you get with Systeme.io is honestly unbelievable.
Systeme.io gives beginners and growing marketers pro-level power at a fraction of the cost — which is why it’s the funnel builder I recommend without hesitation.
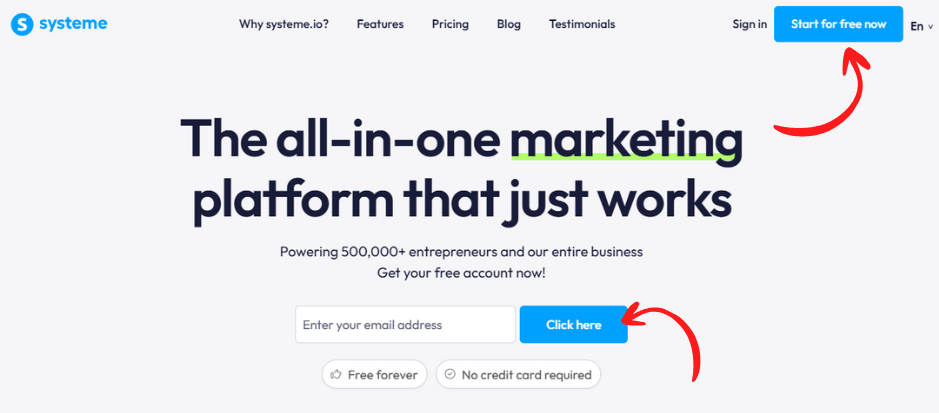
1.3 Register for Your Free Systeme.io Account
Click “Start for free now” or enter your email address under “Get your free account” and click.
This instantly creates your Systeme.io account with access to core tools like funnels, emails, and automations.
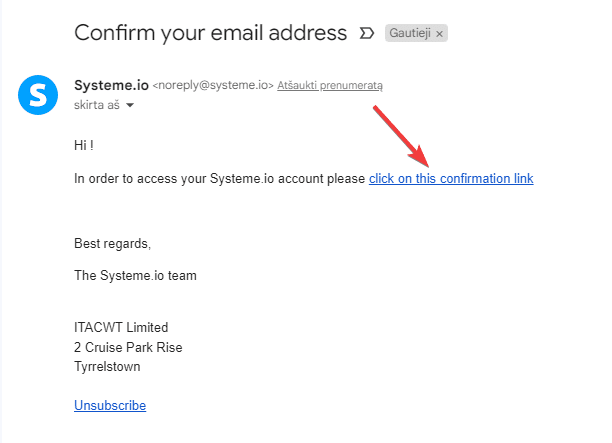
1.4 Confirm Your Email Address
Check your inbox for a confirmation email from Systeme.io. Click the verification link to activate your account and log in.
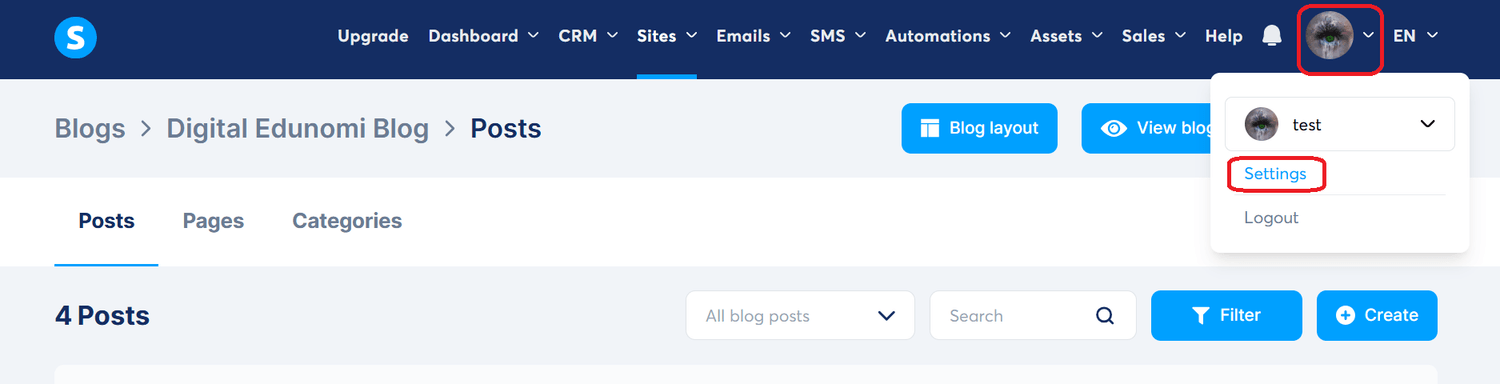
1.5 Complete Your Profile Details
Inside your dashboard, go to Settings → Profile.
Fill in your personal or business information, contact details, and timezone.
Completing this step ensures your emails, automations, and checkout settings work correctly.
Learn Faster with Systeme.io Official Tutorials (Recommended)
Before you dive deeper, I highly recommend watching the free Systeme.io video tutorials. These official step-by-step trainings walk you through every essential feature, helping you understand the platform much faster.
By watching them first, you’ll follow this guide with ease and start building confidently — even if you’re a complete beginner.
Part 2: Setting Up Your Systeme.io Account
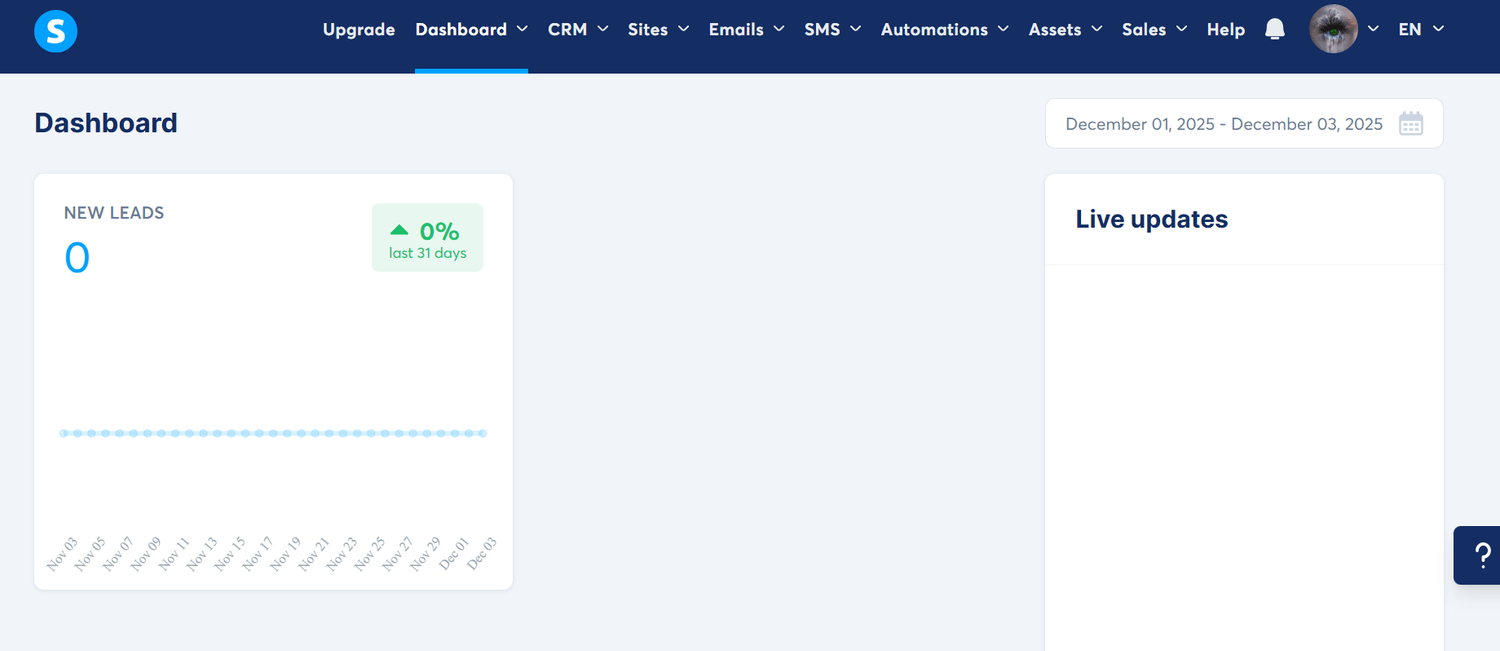
2.1 Navigate and Understand the Systeme.io Dashboard
The Systeme.io dashboard is the command center for your entire online business.
From here, you can manage everything—your sales funnels, email campaigns, online courses, products, and affiliate program.
The top menu provides quick access to all major features:
Dashboard
CRM: Contacts, Tags, Pipelines, Calendar
Sites: Sales Funnels, Creator Stores, Blogs
Emails: Newsletters, Campaigns, Statistics
SMS: SMS Templates, Statistics
Automations: Rules, Workflows
Assets: Physical products, Coupons, Courses, Communities, Files
Sales: Orders, Transactions, Subscriptions, Affiliate invoices
Help
Settings
Sub-accounts
Each section opens the tools you need to build and manage your digital business efficiently.
The interface is clean, beginner-friendly, and designed for fast navigation, which makes getting started easy even if you’re new to funnel building or email marketing.
2.2 Connect Your Custom Domain
If you have your own custom domain (e.g., www.yoursite.com), you can connect it to Systeme.io for your professional branding.
Here’s how:
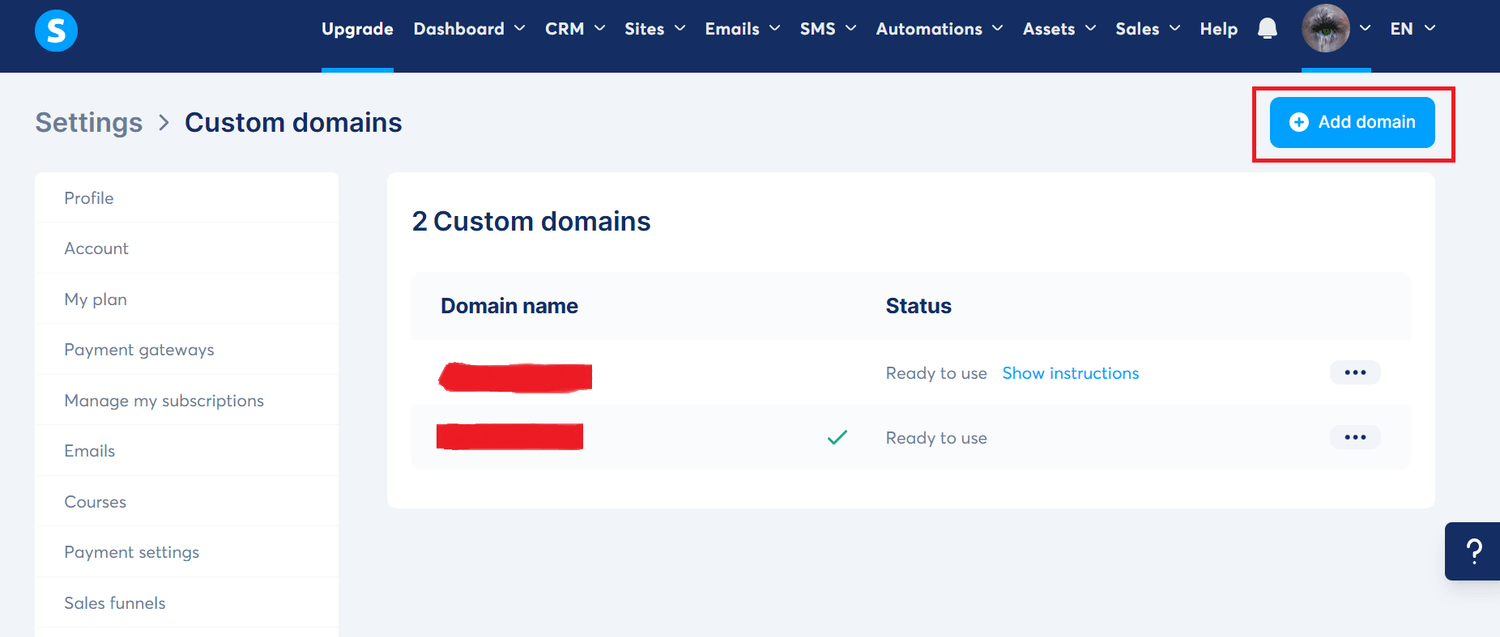
Go to Settings → Custom Domains.
Click “Add domain”.
Enter your domain name (make sure it includes www).
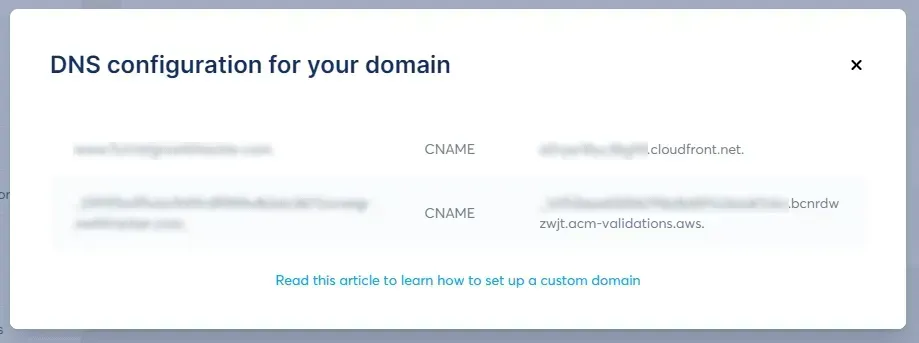
Systeme.io will display the required DNS records you need to add to your domain registrar (like Namecheap, GoDaddy, Cloudflare, etc.).
Update the DNS settings in your registrar’s dashboard.
If you need help, Systeme.io provides a step-by-step DNS guide directly from the popup window — perfect for beginners who aren’t familiar with domain configuration.
Once your DNS records are updated (usually within a few minutes to a few hours), your domain will be fully connected to your Systeme.io account.
2.3 Set Up Your Payment Gateway
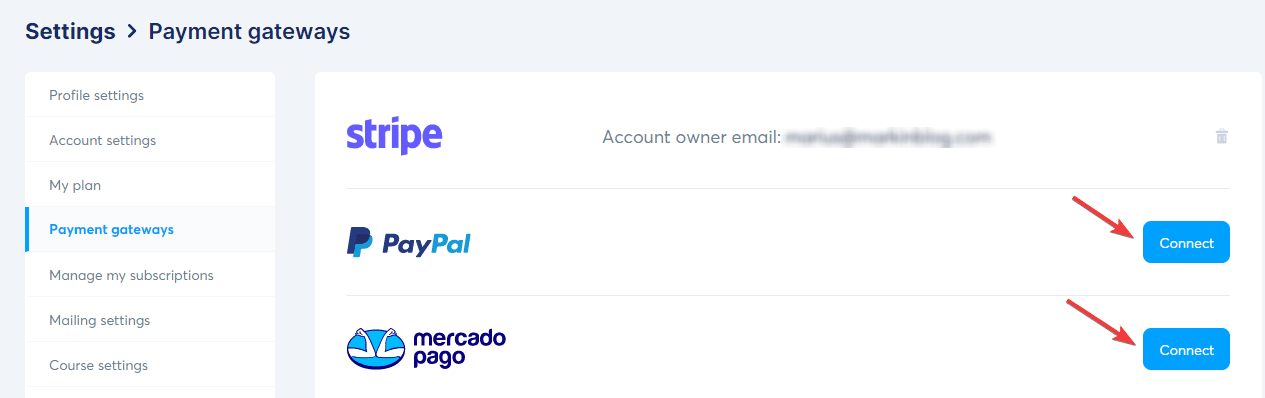
To accept payments for your digital products, services, or courses, you’ll need to connect a payment gateway like Stripe or PayPal.
Follow these steps:
Go to Settings → Payment Gateways.
Choose the gateway you want to connect.
Click “Connect” and follow the on-screen instructions to authorize the integration.
After connecting, it’s a good idea to create a test product and make a test transaction to confirm everything works properly.
If the test purchase succeeds, your payment gateway is fully set up and ready to accept real customer payments.
Part 3: Creating a Sales Funnel in Systeme.io
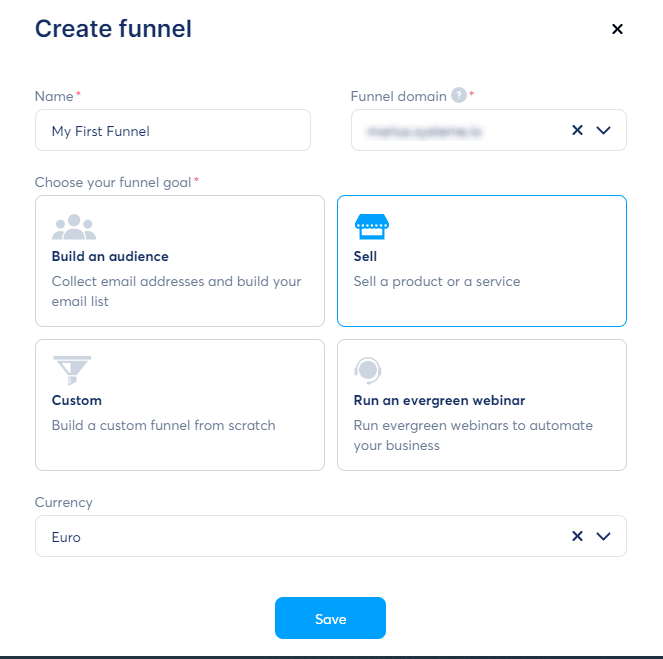
3.1 Define Your Funnel Goal
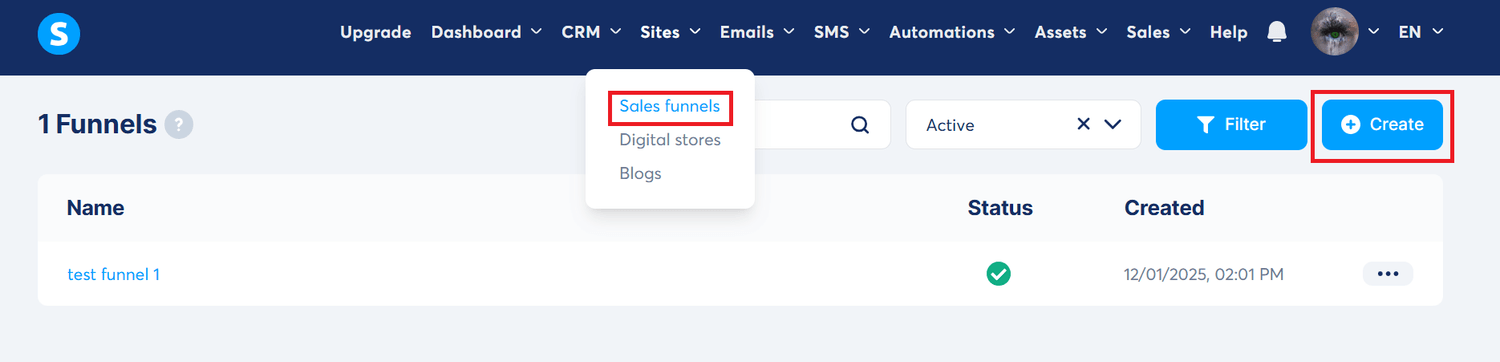
To start building your funnel, go to the Funnels tab in the main dashboard through Sites and click “Create”.
In the popup window:
Enter your funnel name
Select the domain you want to use
Choose your funnel goal (build an audience, sell a product, run a webinar, custom, etc.)
Set your currency
Once everything is filled out, click “Save” to generate your new sales funnel.
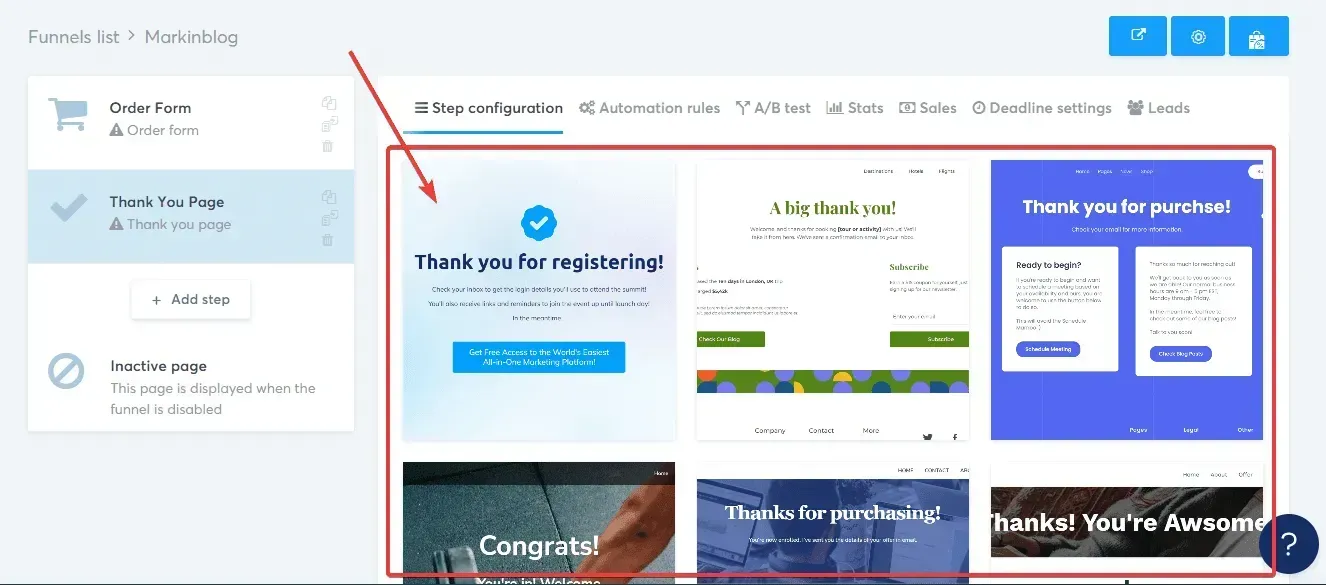
3.2 Choose a Funnel Template
Systeme.io offers a wide range of pre-built funnel templates designed for different goals—lead generation, sales pages, checkout funnels, thank-you pages, and more.
Browse the available templates and select one that matches your business objective and the type of funnel you want to create.
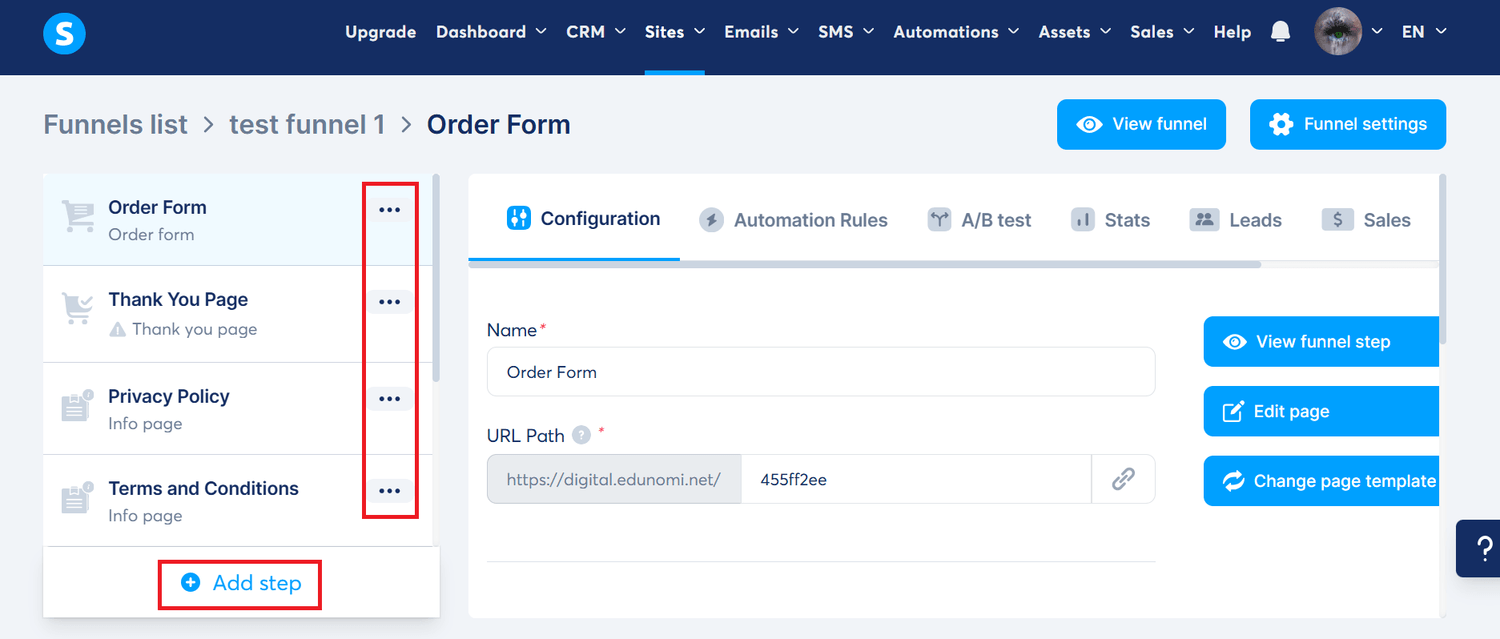
3.3 Customize Your Funnel Steps
After creating your funnel, you’ll see the default steps included inside it.
You can add, delete, rename, or rearrange steps depending on your marketing strategy.
Common funnel steps include:
Landing (opt-in) page
Sales page
Order/checkout page
Upsell or downsell page
Thank-you page
Systeme.io lets you modify each step so your funnel flows exactly the way you need.
Part 4: Building Your Funnel Pages
4.1 Customize Your Page Design Using the Drag-and-Drop Editor
Select the page you want to edit and click “Edit page”.
This opens Systeme.io’s intuitive drag-and-drop editor, where you can visually design each page.
You can rearrange or add page elements simply by dragging them into place—no coding required.
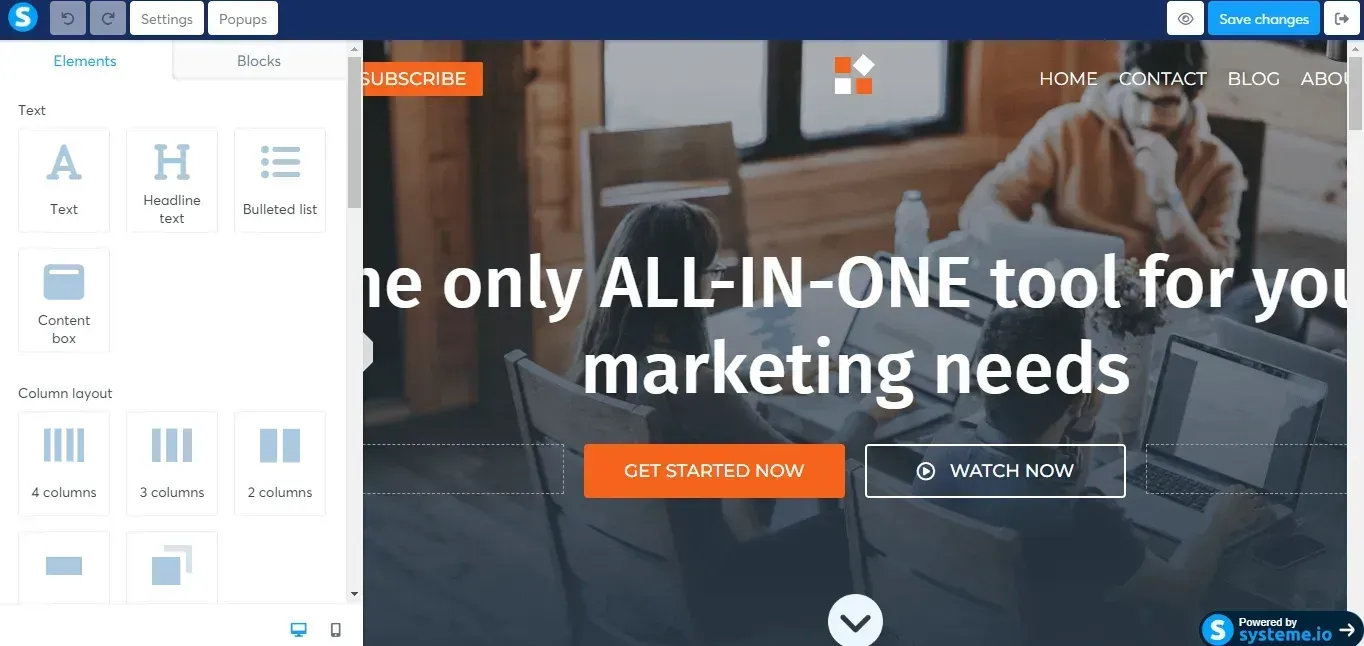
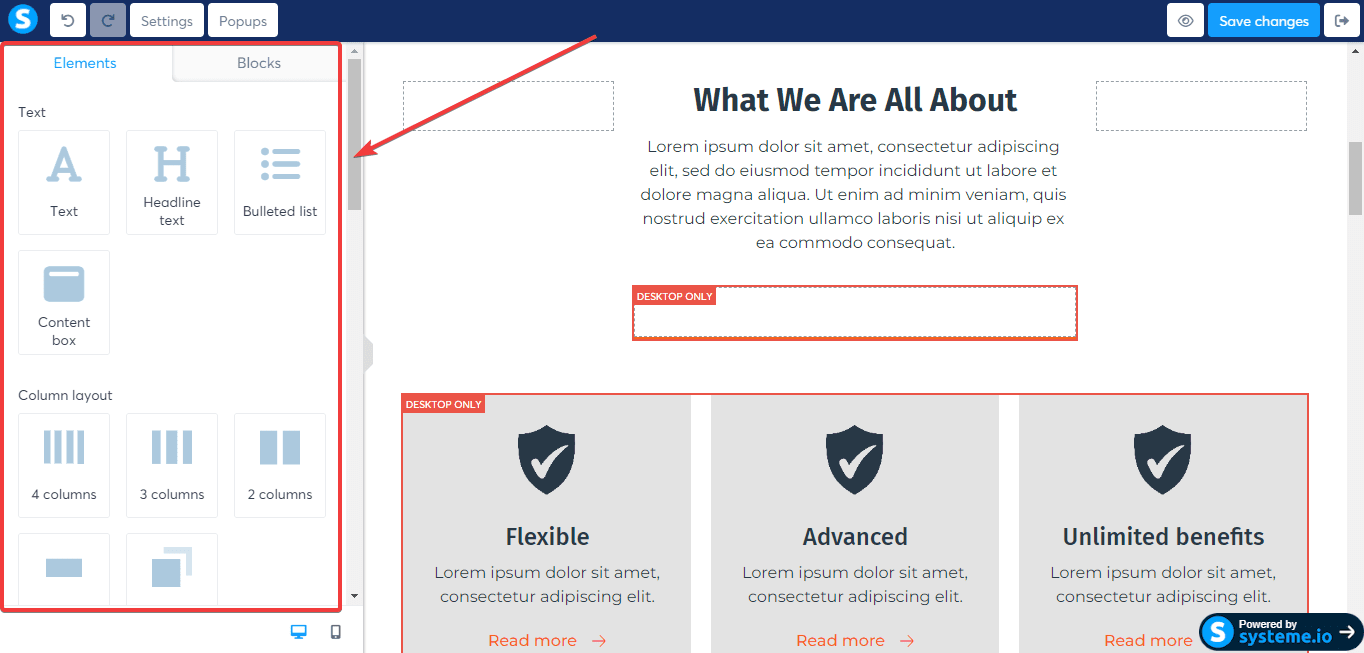
4.2 Add and Edit Page Elements
Inside the editor, you can insert a variety of elements, including:
Headlines & text blocks
Images and videos
Buttons and call-to-action sections
Opt-in and checkout forms
Countdown timers
Testimonials
Each element can be customized for fonts, colors, sizes, spacing, and styling to match your brand.
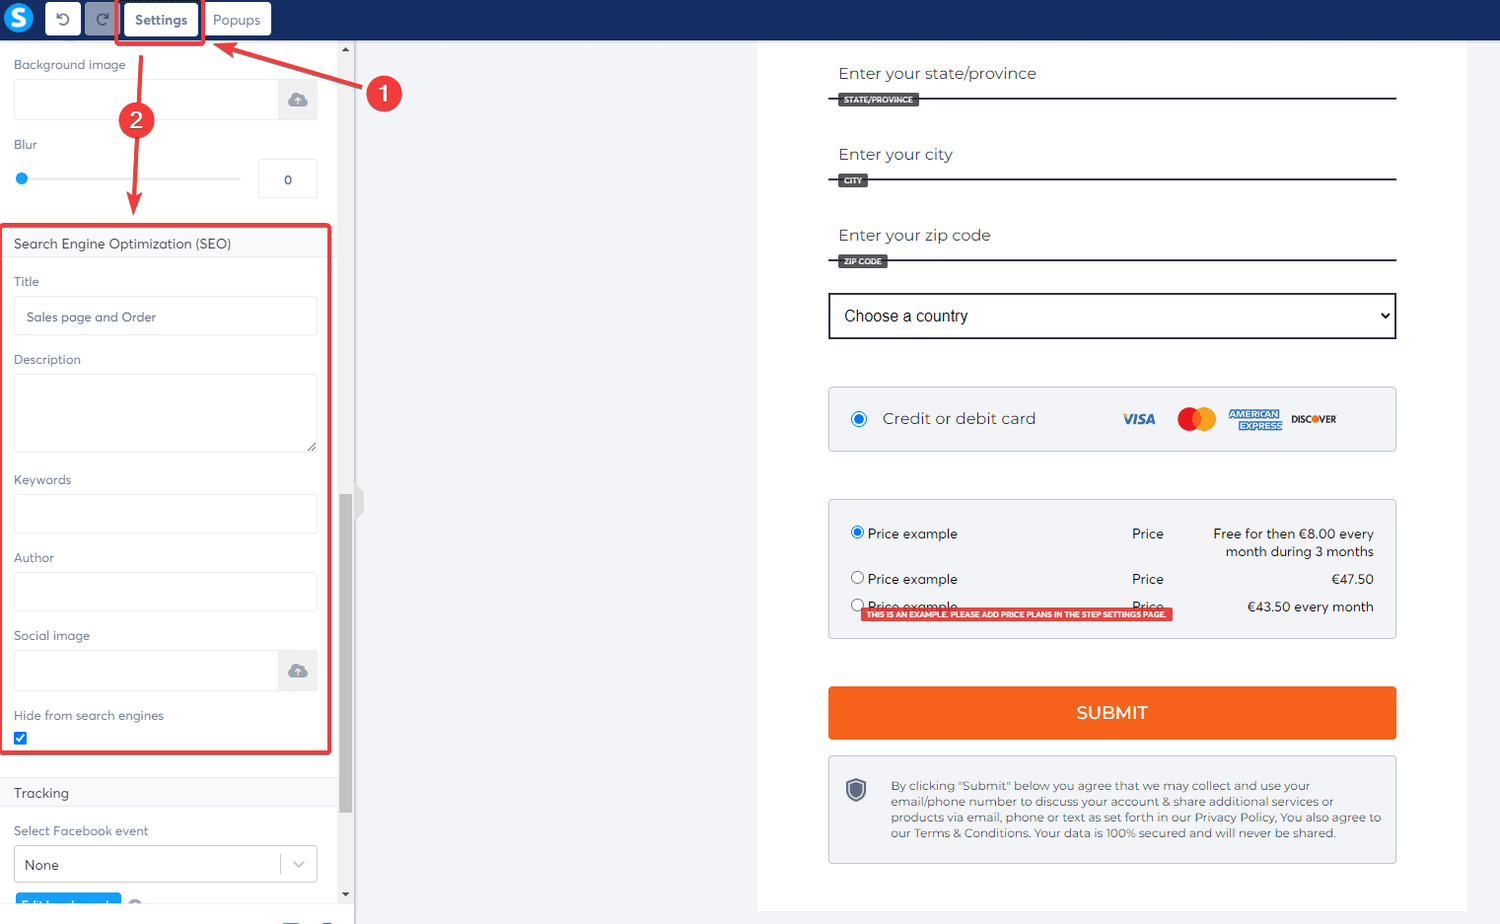
4.3 Optimize Each Page for SEO
To improve your search engine visibility, Systeme.io allows you to add SEO details to every page.
Inside the editor:
Click “Settings” on the left menu.
Scroll to the Search Engine Optimization (SEO) section.
Add your meta title, meta description, and relevant keywords.
Optimizing these fields helps your funnel pages rank better on Google and increases organic traffic.
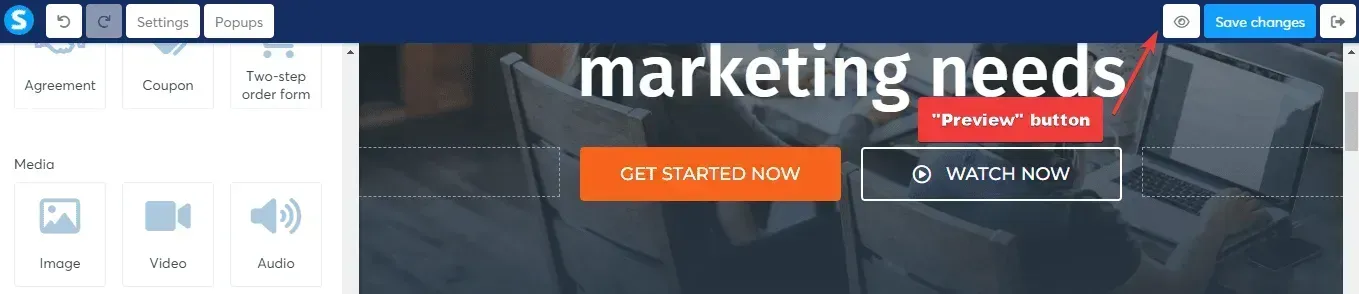
4.4 Preview and Publish Your Funnel Pages
Use the “Preview” button to see how your page looks on desktop, tablet, and mobile.
If everything looks good, click “Publish” to make the page live on your domain.
Part 5: Managing Your Contacts and Leads in Systeme.io
5.1 Import Your Existing Contacts
If you already have an email list, you can easily import it into Systeme.io using a CSV file.
This lets you integrate your old subscribers into your new funnels and email campaigns seamlessly.
How to Import Contacts (Step-by-Step)
Prepare your CSV file
Make sure your file is in CSV format.
The first row should contain headers such as:
email
first_name
last_name
Any other fields you use.
Each row should include the appropriate contact data.
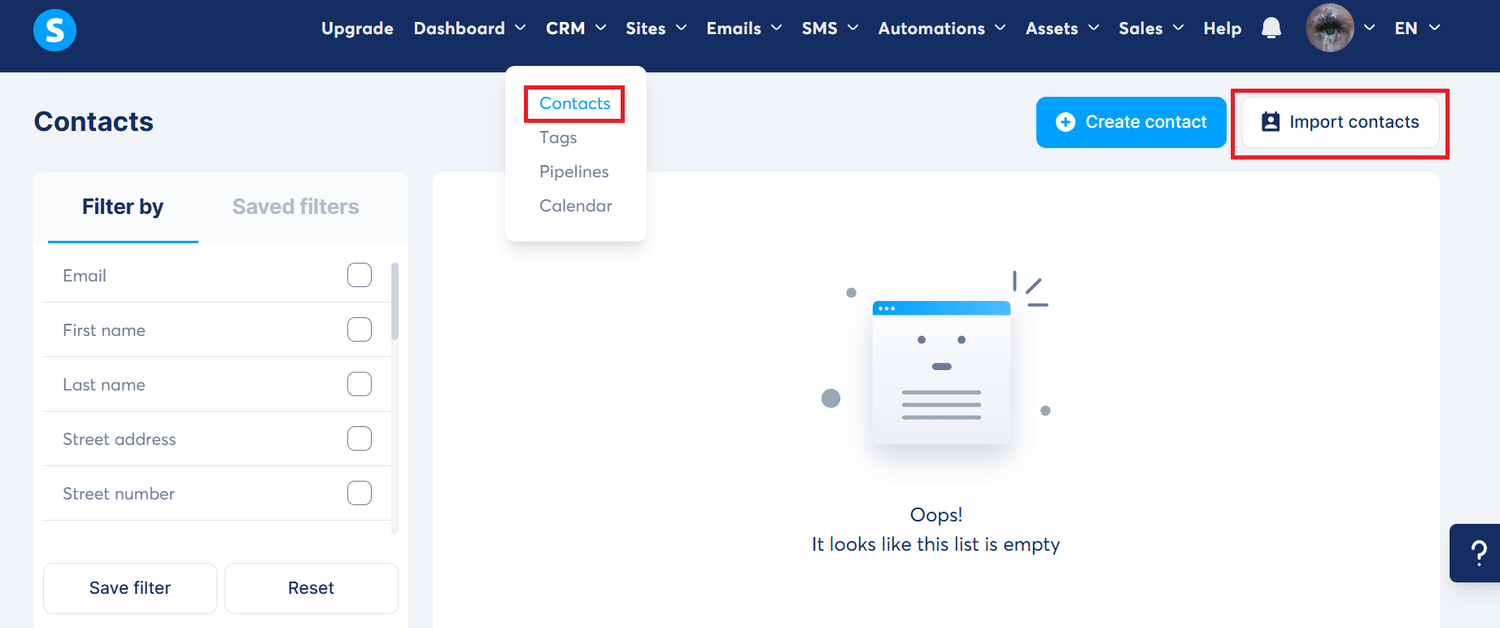
Go to Contacts
From your dashboard, click Contacts in the sidebar.
Click “Import contacts”
At the top right, click Import contacts to open the upload window.
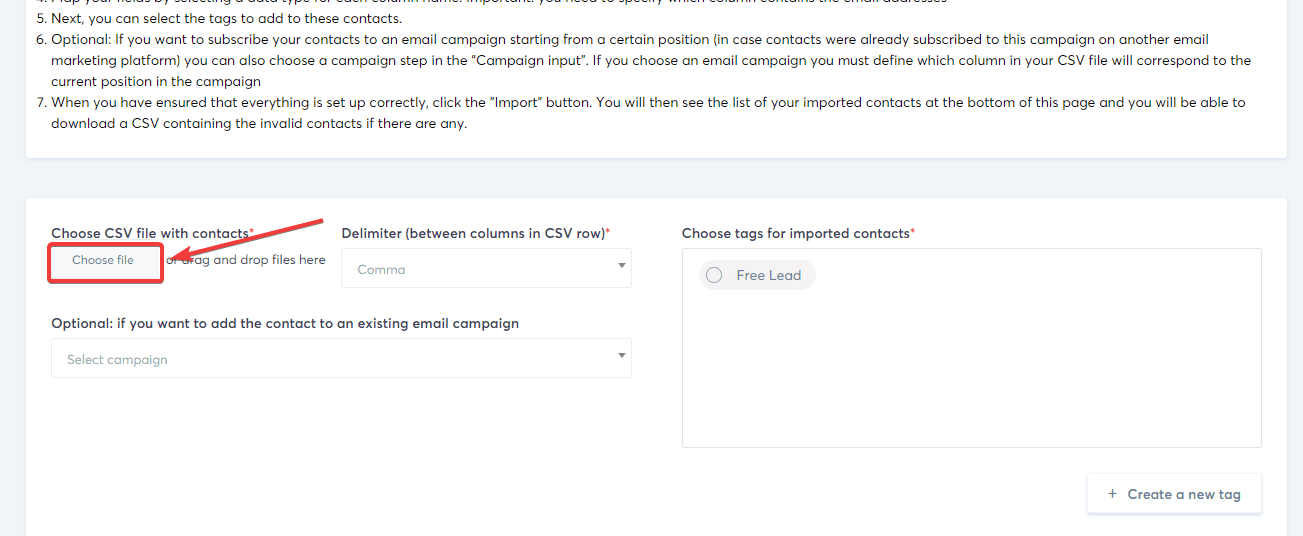
Upload your CSV file
Click Choose file and select your prepared CSV file.
(Optional) Add contacts to a list or email campaign
Select a list or campaign from the dropdown if you want to automatically assign imported contacts.
Map your fields
Systeme.io will show a preview of the data.
Match each CSV column (e.g., email) to a Systeme.io field.
Import your contacts
Click Import contacts to begin the upload.
Monitor progress
Large lists may take several minutes.
You’ll see a confirmation when the import is complete.
5.2 Create and Manage Tags for Better Segmentation
Tags help you organize contacts based on behavior, interest, engagement, or demographic information.
Using tags allows you to run targeted email campaigns that convert better.
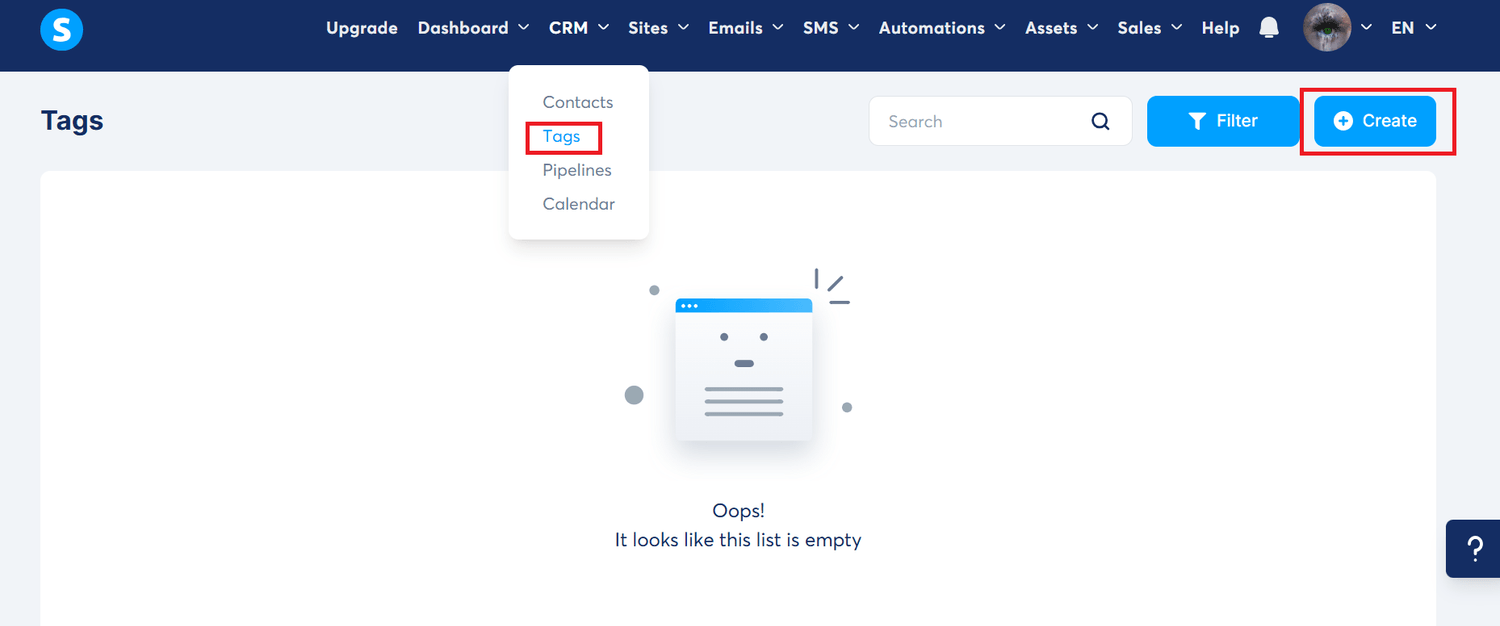
How to Create Tags
Go to Contacts → Tags.
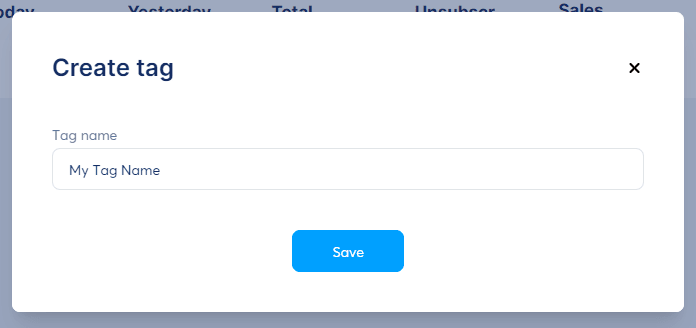
Click Create (top right).
Enter a descriptive tag name (e.g., “buyer”, “hot lead”, “webinar signup”).
Click Save.
How to Assign Tags to Contacts
Open Contacts and select the customer you want to update.
Click More Actions → Add tag.
Choose the tag from the dropdown.
Click Save.
How to Remove Tags
Open the contact profile.
Click More Actions → Delete tag.
Choose the tag to remove and save.
5.3 Set Up Automation Rules & Workflows for Lead Nurturing
Systeme.io’s automation tools allow you to build hands-free workflows — like sending welcome emails, tagging leads, starting campaigns, or segmenting contacts based on behavior.
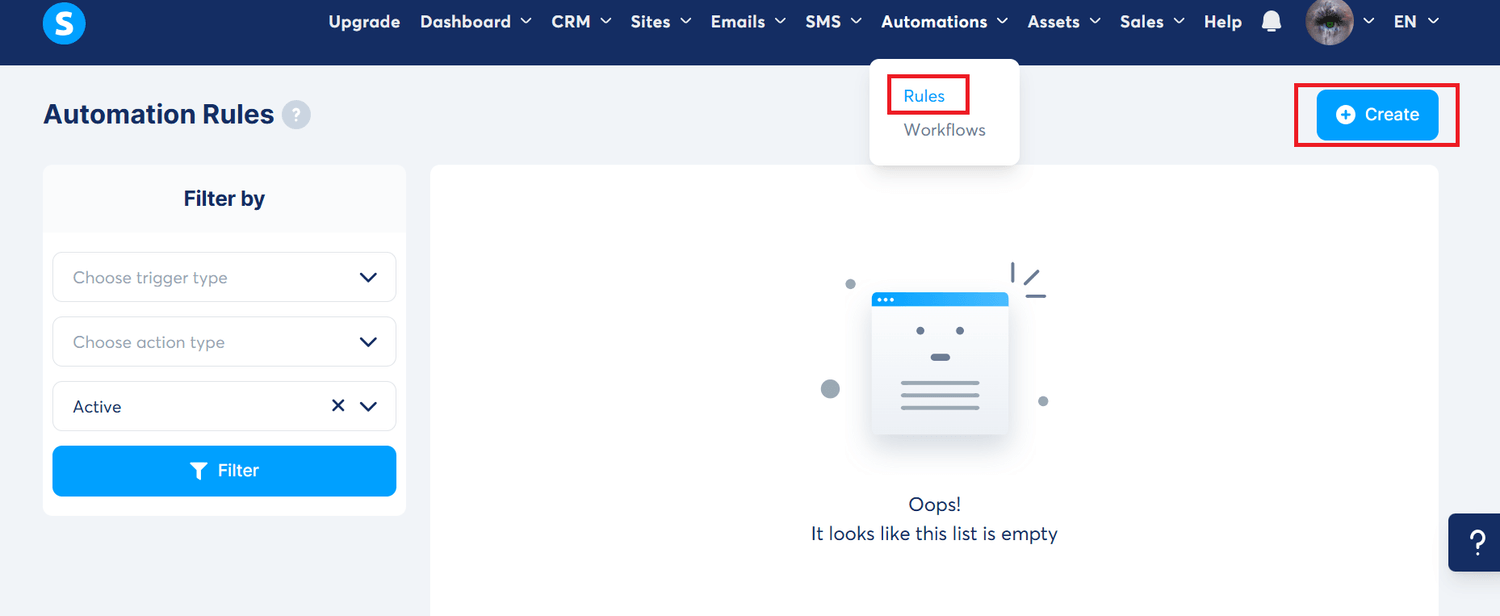
How to Create Automation Rules
Go to Automations → Rules.
Click + Create.
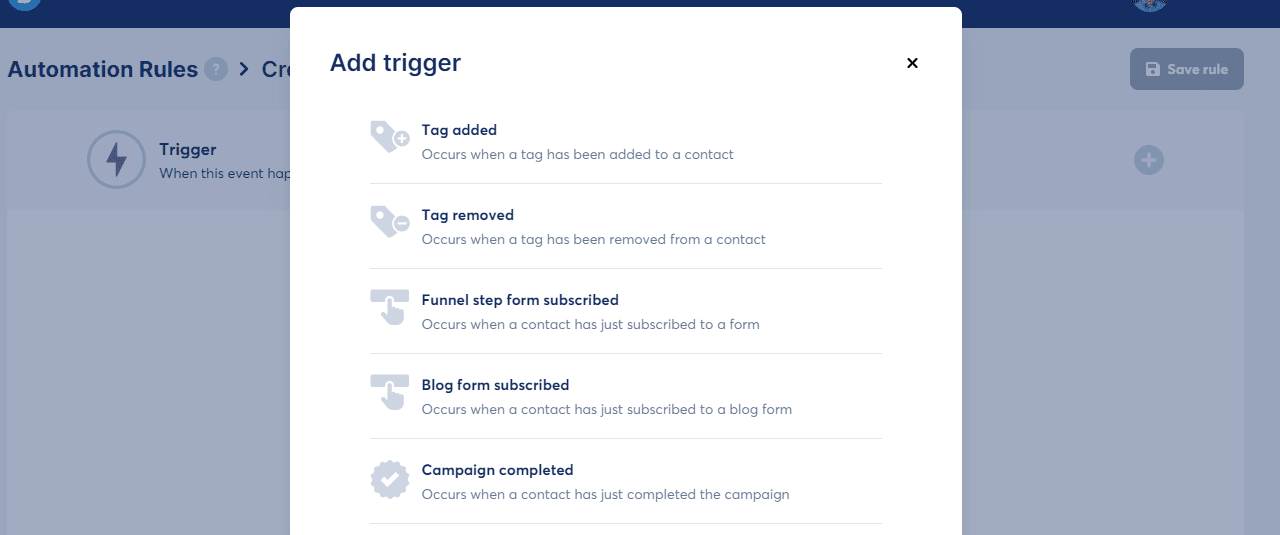
Choose a trigger, such as:
Funnel step form subscribed
New sale
Tag added
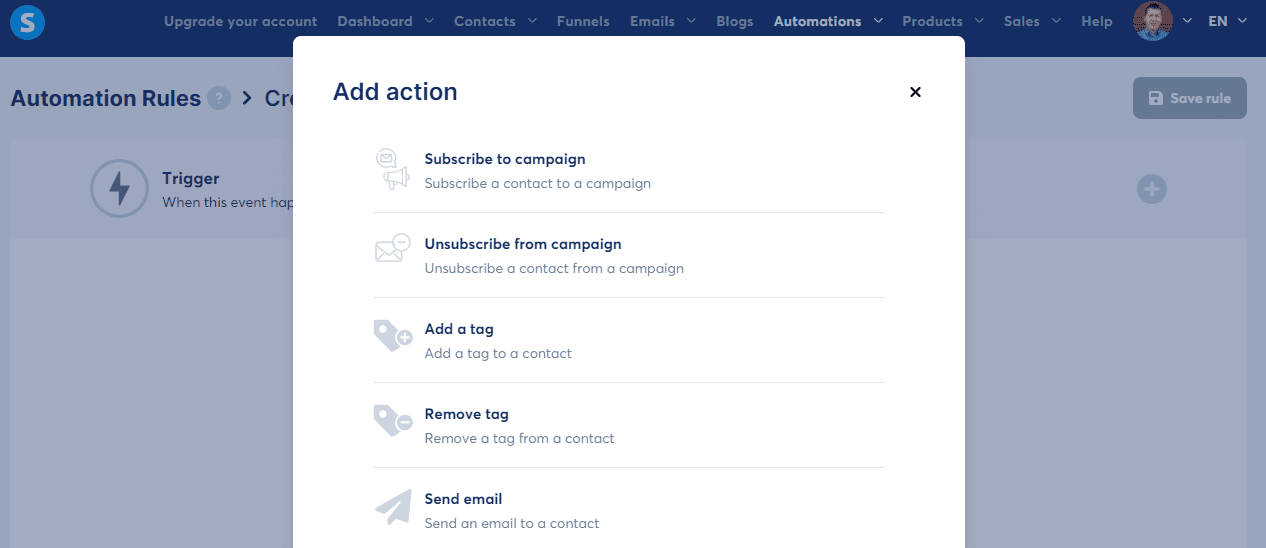
Choose an action, such as:
Send an email
Add a tag
Subscribe to a campaign
Click Save Rule.
How to Create Workflows
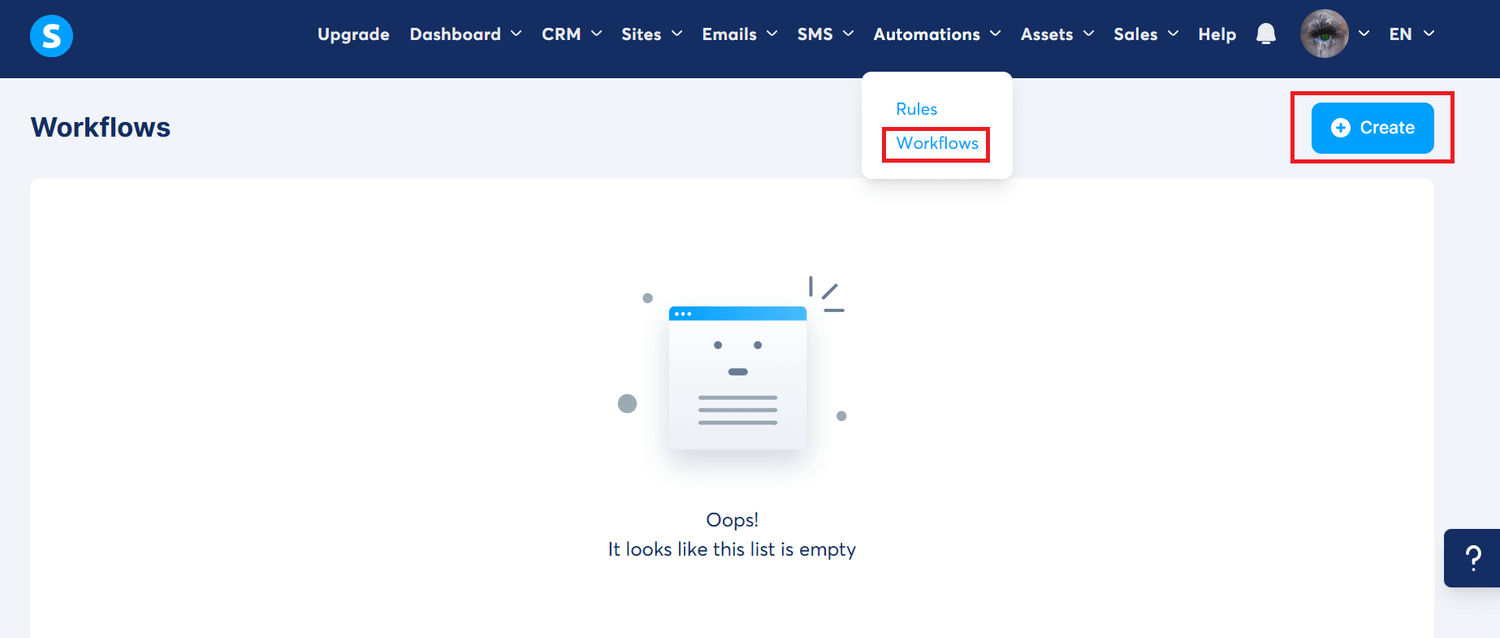
Go to Automations → Workflows.
Click Create, name your workflow, and save.
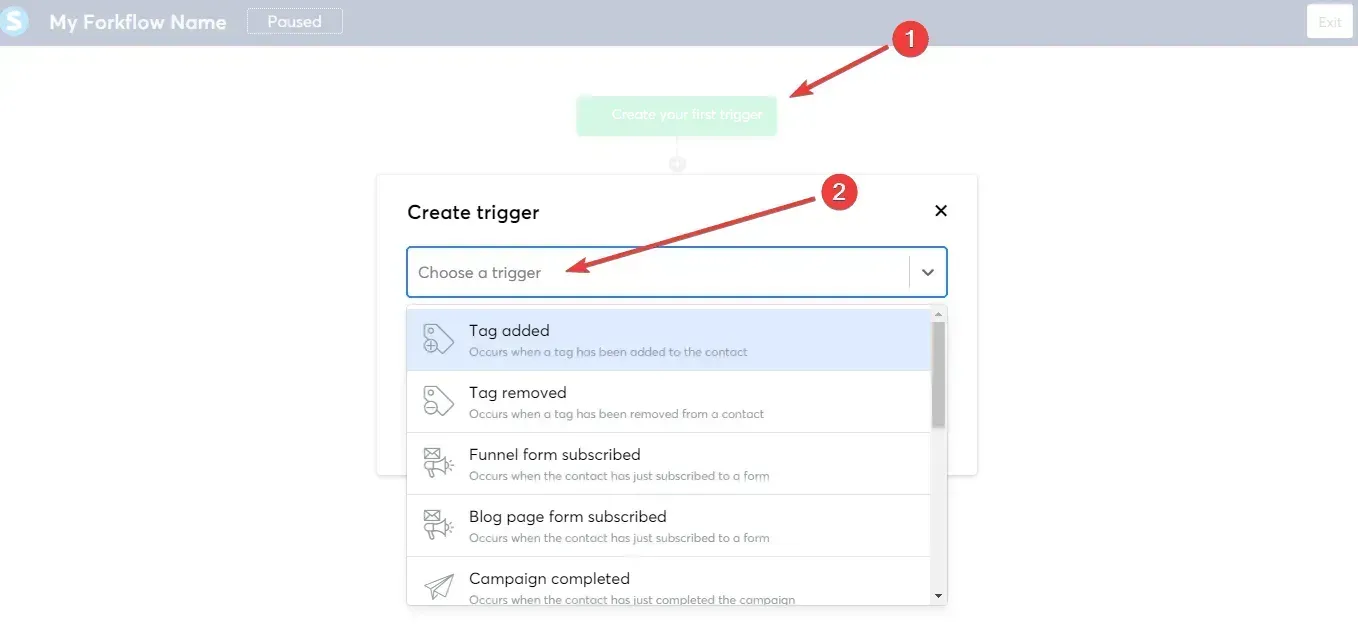
Add your trigger (e.g., form subscribed, tag added).
Add steps such as:
Actions: add tag, remove tag, subscribe to campaign
Decisions: branch your workflow based on contact conditions
Delays: wait hours/days before the next step
Configure each step.
Save and click Activate to start your workflow.
Part 6: Additional Systeme.io Features
6.1 Create and Sell Online Courses
Systeme.io includes a complete online course builder that lets you design, host, and sell your digital courses without any extra software.
How to Create a Course (Step-by-Step)
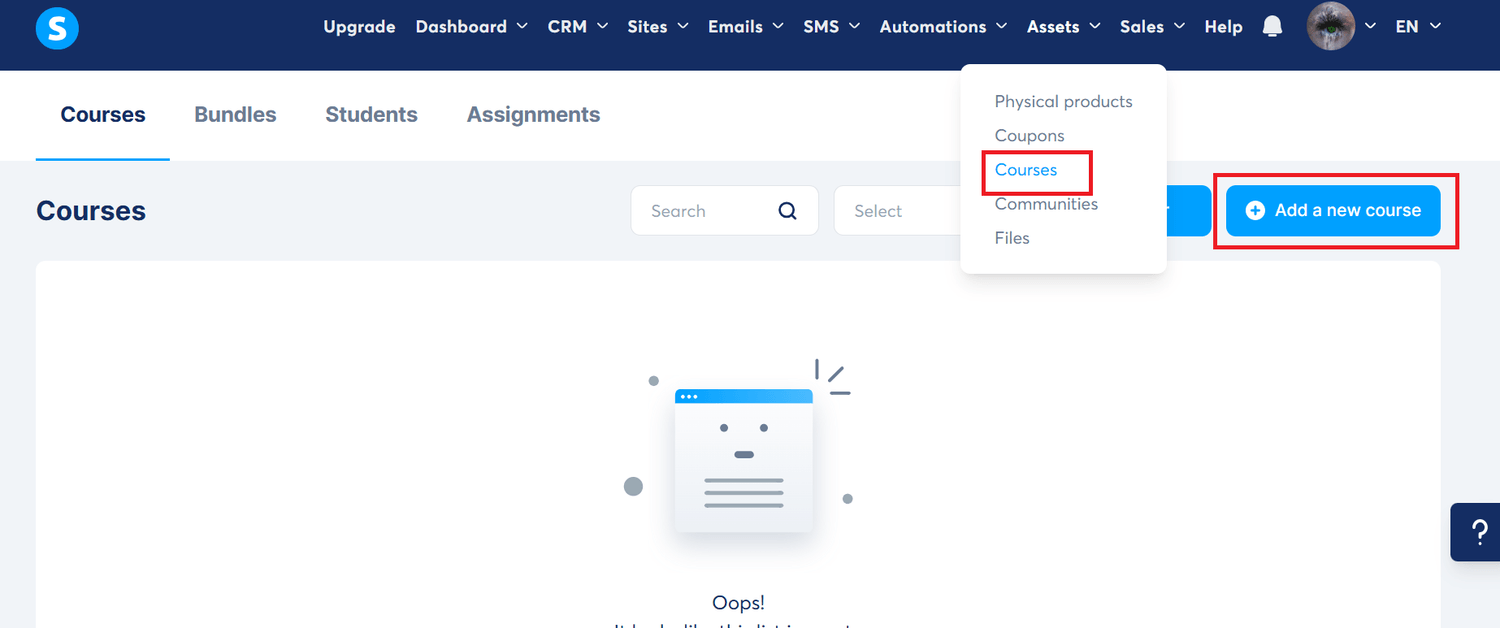
Go to Products → Courses.
Click Add a new course.
Enter your course name, description, and upload images.
Click Save.
Add Modules & Lectures
Click Add module and name it (e.g., “Module 1: Introduction”).
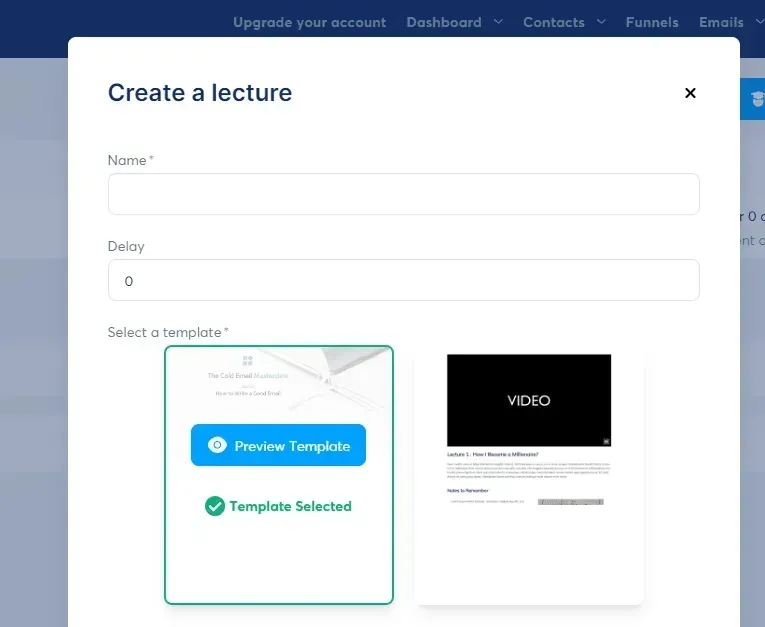
Inside your module, click Add lecture.
Enter lecture name and delay settings (optional).
Choose a template and customize it in the editor.
Save your lecture.
Repeat until all course lectures are complete.
Connect Your Course to a Sales Funnel
Create a new funnel under Funnels → Create.
Choose a Sell a product funnel type.
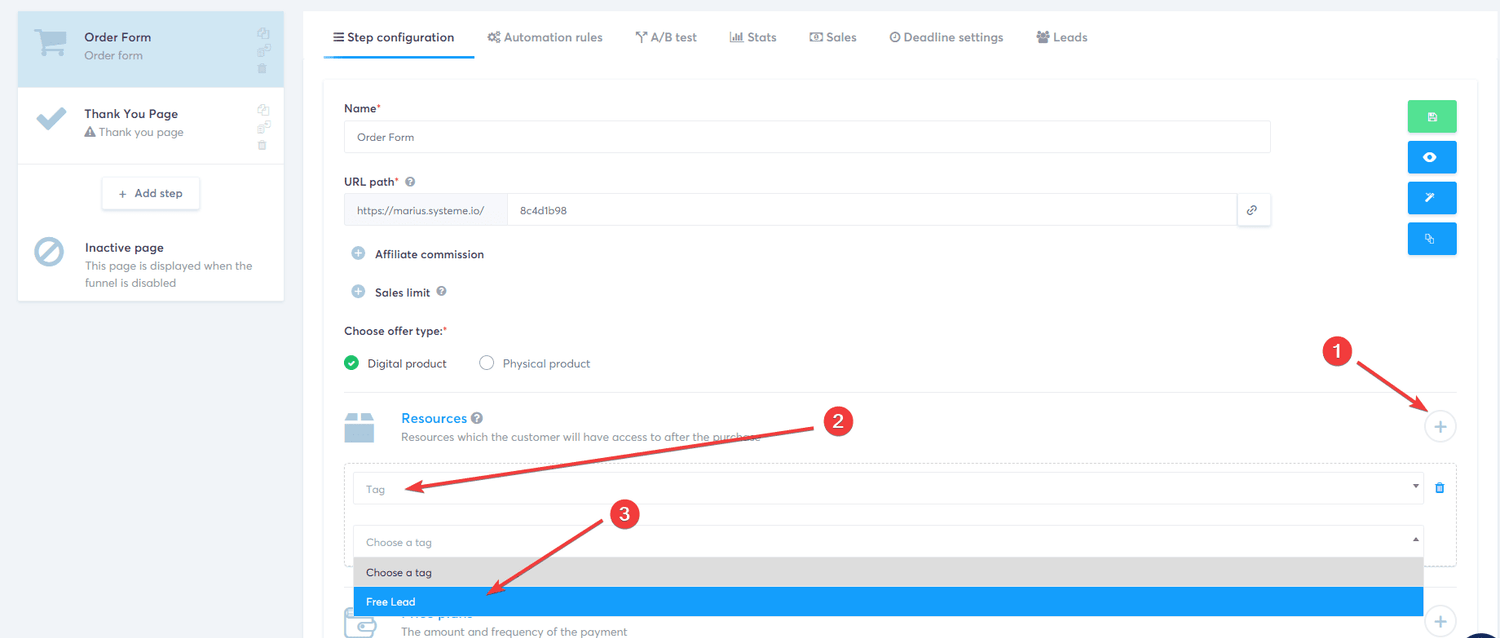
Open your Order Form step.
Set Offer type = Digital product.
Under Resources, click “+” → choose Course, and select the course you created.
Choose full access or drip content settings.
(Optional) Add a tag to enrolled students for segmentation.
Save and publish.
Promote Your Course
Share your sales page link via social media, email campaigns, paid ads, or your website.

6.2 Set Up an Affiliate Program
Systeme.io allows you to launch a built-in affiliate program so others can promote your products and earn commissions.
Step 1: Create a Funnel for Your Offer
Create a sales funnel with an order form where affiliates will drive traffic.
Step 2: Set Up Your Order Form Page
Configure your order form following the instructions in your funnel.
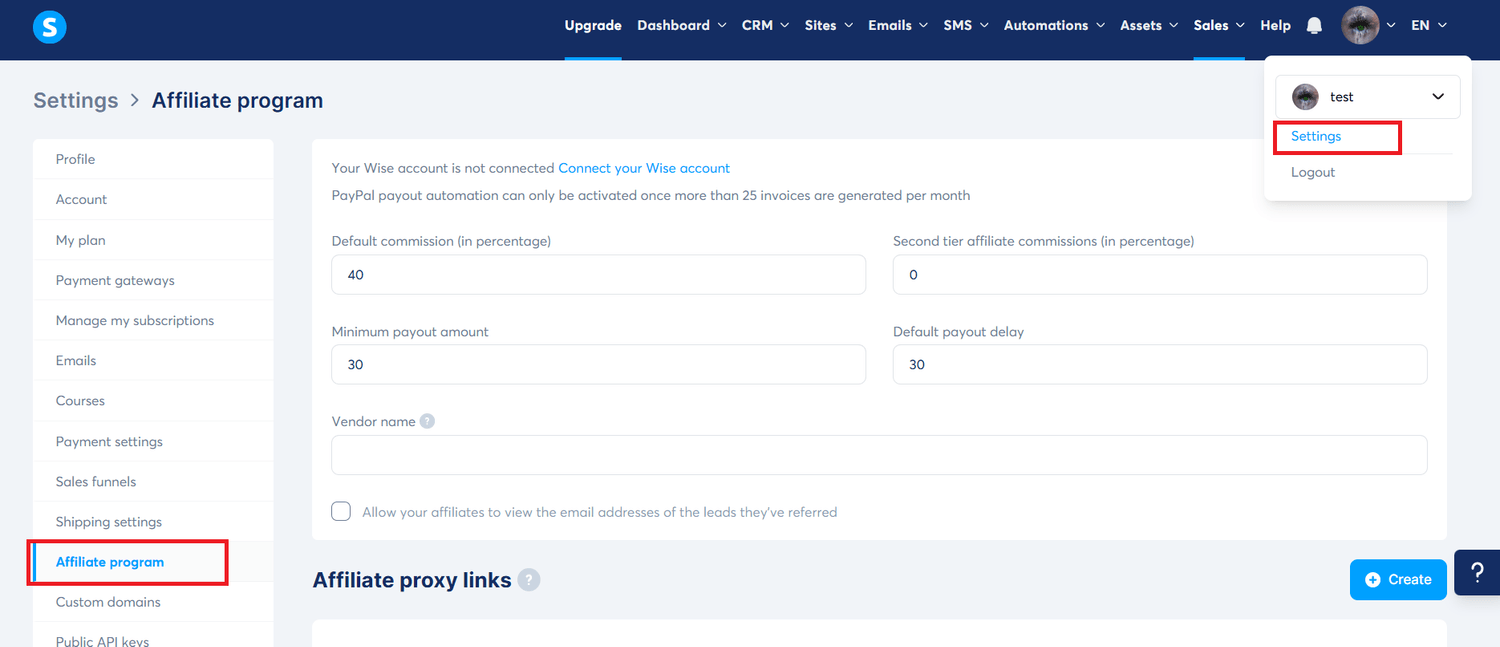
Step 3: Configure Affiliate Settings
Go to Settings → Affiliate program settings.
Set:
Default commission percentage
Minimum payout amount
Payout delay
Second-tier commissions (optional)
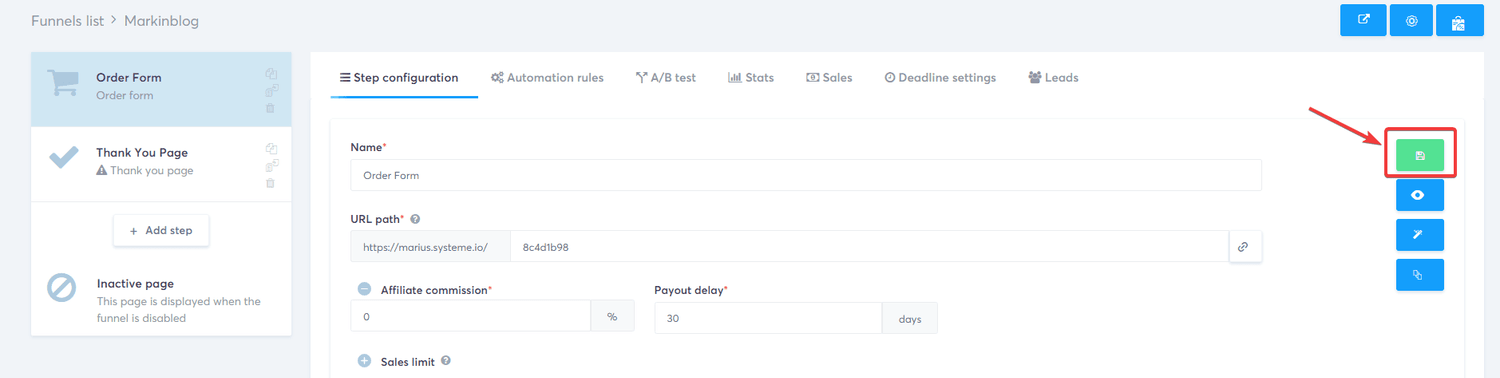
Step 4: Customize Commissions for Each Funnel
Open your Order Form page.
Click Settings.
Adjust:
Commission percentage
Payment period
Save changes.
Step 5: Disable Commissions for Specific Pages (Optional)
If a funnel should not pay commissions, simply set the commission to 0% for all related pages.
Frequently Asked Questions (FAQs)
About Systeme.io
1. Can I use Systeme.io to host a blog?
Yes! Systeme.io includes a built-in blogging feature that allows you to create and publish blog posts directly on your custom domain—no WordPress or third-party tools required. This makes it easy to share content, attract traffic, and improve SEO for your funnels.
2. Does Systeme.io support multiple languages?
Absolutely. You can create funnels, landing pages, emails, and online courses in multiple languages. Systeme.io also supports localization, letting you customize language settings for each funnel to better reach your international audience.
3. Can I migrate from another platform to Systeme.io?
Yes. While Systeme.io doesn’t provide fully automated migration, you can easily import contacts via CSV, rebuild funnels using templates, and manually move over products or course content. The process is beginner-friendly and allows a smooth transition from other marketing platforms.
4. How does Systeme.io handle file hosting for digital products?
Systeme.io lets you upload files like PDFs, videos, and images directly to the platform. These files can be delivered automatically through funnels, email sequences, or course modules after a purchase or opt-in.
5. Is Systeme.io GDPR-compliant?
Yes. Systeme.io includes tools such as consent checkboxes, unsubscribe links, and data access controls to help you meet GDPR requirements. Make sure to configure these settings properly according to your audience and legal needs.
Ready to Launch Your Business with Systeme.io?
Systeme.io gives you everything you need to build sales funnels, send email campaigns, sell digital products, and automate your business—all in one powerful platform.
It’s beginner-friendly, easy to use, and scalable enough to grow with your business. With Systeme.io, you can have your first funnel live in just a few steps.
Helpful Resources for Systeme.io Users
Official Systeme.io Youtube Channel: https://www.youtube.com/@SystemeioFromZerotoLaunch
This channel features a variety of videos that cover different aspects of using Systeme.io
Official Facebook Group: Systeme.io Creators’ Group
This is a group of users and experts that you can use to connect with other Systeme.io users and get help from experienced professionals.
Systeme.io’s dedicated support team and active community make it easy to get help whenever you need it. Start using this all-in-one marketing platform to grow your business faster and smarter!

Nomi Bayasgalan
An author and blogger passionate about helping entrepreneurs grow online businesses with tools like Systeme.io.
Stay informed with valuable tools and tips delivered straight to your inbox.

Fuel Your Digital Growth Daily


Get Expert Online Marketing Tips Delivered Right To Your Inbox!
Edunomi © 2026 All Rights Reserved